Today I’m going to diy lighted canvas art and bring some joy into a dreary winter day. I’ve been wanting to do something like this for awhile and now getting around to it ?? I’m also going to use one of my own paintings, and a few other materials, you can follow that route or build up your own art too!
If you love the look of lighted canvas art, you’re going to love this too – you just need some basic art supplies and some of those little midget sized “fairy lights” and you’ll be in business. I thought doing something like this might be complicated, but I found out it’s not. Just follow along with me and let’s get going!
Materials List
If you’re like me and painting is one of your favorite hobbies, you can choose one that’s ready-made, or start from scratch with a blank canvas, a size like 16 by 20 would be ideal and the painting I’m using is that size.
Some of those “fairy” lights, preferably battery operated – – I know these are harder to find in stores before the Christmas shopping season hits so I took the liberty of picking out a suitable one.
This set I have is perfect because the lights are blunt and don’t have the pointy tip that sticks out. Look for a set like that if you can – I think it’s labeled as “5mm”.
You’ll also need a sharp tool like an awl, that can cut precise holes, I’m using a drill with a medium sized bit . A permanent marker and possibly some tape.
Light Up Canvas Tutorial
If you’re starting from scratch with a blank canvas, now’s the time to paint it with whatever idea you’ve had in mind -whatever that may be ?? Be sure to let it dry before proceeding with the rest of this tutorial. OR if you’ve already got a canvas picture…You’re ready to go!

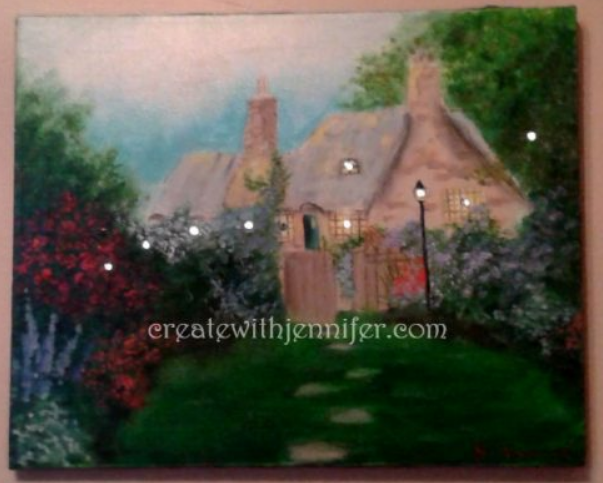
I chose one of my older paintings I did way back when. I was always enamored with the bucolic style of Thomas Kincade, and this one is ideal because it has a cottage in the background with illuminated windows.
Right now first step is to establish a pattern with my light string so they won’t be in a clump in one spot. Try to scatter your light string, depending on how many lights you have, so they will make a nice pattern.
I’m trying to follow the contours of the cottage lit-up windows and arrange my lights in those areas. The remaining lights will just go around the foliage in the background. When you have the right arrangement, take a pushpin and mark the spots you want the lights to go.
In addition to piercing the spots, I also drew little circles around making it easier to find them. on the back of the canvas.

Part of the problem with drilling holes is that I always try to get a “neat” look without a frayed edge. I put some tape over each hole before I started drilling. Once you have marked your spots correctly you can use your instrument of choice to make the holes.
If you use a drill, light pressure is all that is needed. Take one light and attempt to push it through the first hole to make sure it is a good fit before proceeding .
The bit size I chose is 4.36 mm. I held up one of the lights next to all the bits in their holder to take a guess at the best size bit for the job. Blow off any remaining dust…you should have strategically placed holes for each individual light now.
Now you can start inserting each of the lights through the holes. If you’ve got the right size hole, the lights will stay in place easily, you won’t need anything to secure them.

You may, however, need to secure the battery compartment somewhere – duct tape will work for that step.
You can cut a piece of cardboard to go on the back, just be sure to cut around the battery dealie so you can easily switch the lights on and off. Oh, and speaking of which, switch them on now and test them out. how do they look? Pretty right?
At first I didn’t use cardboard, but then the lights kind of had a way of popping out from time to time when I would switch it on, so I cut a piece for the back to give the lights more stability and hide them, overall. I also made a video too so you can see how all the parts come together.
Now find a good place to hang your picture – or set it up on a tabletop, your call. I had to reinsert the eye hooks and wire, I must have taken them out at an earlier time.

I find it looks the best when I switch it on in the evening – those lights really twinkle! Now you’ve got a beautiful diy lighted canvas art piece that you’ll be proud to show off. Enjoy!!
No comments:
Post a Comment
Note: Only a member of this blog may post a comment.